Dr. Ara Nazarian discusses an easy and predictable solution for instant implant temporaries
Although widely utilized in conventional crown and bridge applications, direct provisional restorations have traditionally been underused in implant therapy. Time-intensive surgical procedures may make the dentist reluctant to dedicate additional chair time to the proper fabrication of a “mere temporary.” This unfortunate attitude often ends up costing even more time and expense at subsequent appointments, and can cause the overall quality of the final restoration to suffer.
 Using new technologies that offer dental providers an easy and predictable way of efficiently creating a direct implant provisional contributes to the success of an implant case. Good Fit Technologies offers Instant Implant Temps, a pre-set arrangement of denture teeth in a variety of shapes and shades, festooned and set in an adjustable denture base. Instant Implant Temps (Good Fit) can be adapted and fitted in minutes to create immediate implant provisionals and hybrid implant dentures because the base material is made of a thermoplastic polymethyl methacrylate (PMMA) material.
Placing the thermoplastic temporary into a water bath of 90-100°C for about 2-3 minutes will make the product moldable, but you can adjust that temperature and time to suit your needs. Hotter temperatures for longer times will make the temporary more moldable; cooler temperatures for shorter times will make it less moldable. So you just drop it in hot water to make the product moldable and then adapt it in the patient’s mouth or on a model, depending on if you want to do a direct or indirect procedure (Note: the product will remain moldable for approximately 1-2 minutes after cooling to a temperature that is comfortable for use inside the patient’s mouth). After 1 or 2 minutes — or in seconds, if you dip it in cold water — the temporary will become very rigid with no shape distortion from the cooling. It is important to note that the templates can be reheated many times to achieve the proper fit on the model or in the mouth.
Once set to the desired arch form, the provider may transfer the position of the abutments by relining the internal aspect of the temporary with bite registration material to identify where the temporary needs to be relieved. If reduction of the inner bevel is not necessary, one may use pink Triad® (Dentsply) to fill in the area. Once molded to the abutments and ridge, the temporary may be pulled off, making sure not to disrupt the material. After inspection, it may be cured with a hand curing light. With a lab acrylic bur, the receiving areas are enlarged slightly to allow a passive fit, and the rest of the temporary is trimmed to create a convex surface allowing for easy cleansability.
Whether cemented or screw-retained, a provisional serves as the interim prosthesis while implants heal, and a definitive restoration is fabricated. But if its effectiveness is maximized, a provisional restorative prosthesis provides three principal benefits:
Protects the implants and underlying grafted sites: Long-term success of any implant-borne restoration depends heavily on the integration of the supporting implant. A proper provisional must, therefore, protect the surgical site from occlusal forces during the healing process, preventing micro-movement of the implant and any associated bone grafts.
Protects and forms the underlying gingival tissues: Along with preserving bone health, a provisional must protect its underlying gingival tissues. The provisional can also be used to shape the associated soft tissue during the maturation phase. The ability to manage and sculpt the surrounding soft tissue leads to greater predictability in the seating of the final prosthesis.
Determines the size, shape, and shade of the final restoration: Beyond helping to establish the health and shape of the supportive tissues, a provisional restoration can act as the blueprint for the final prosthesis. The restorative dentist is therefore able to obtain a hands-on feel for the eventual solution using a working prototype in the actual oral environment. Dimensions and morphology can be precisely transferred to the laboratory via scan or impression for use in the fabrication of the final restoration, increasing the likelihood of patient acceptance during that final visit.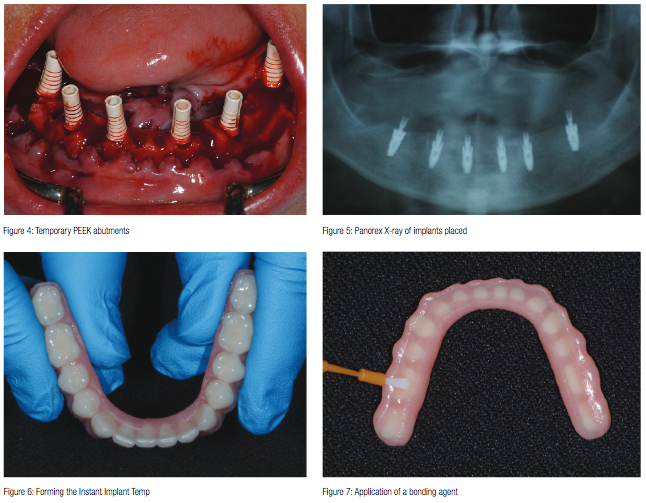
Case presentation
When a patient presented to the practice with an upper complete denture and a failing lower dentition (Figure 1), a CBCT scan (i-CAT™, Imaging Sciences International) was taken to accurately treatment plan this case. The final treatment plan would consist of a fixed bridge for the lower arch on implants opposing a new full upper complete denture. SimPlant® software (Materialise Dental) was used through 3D Diagnostix virtual assistance to precisely plan the placement of six dental implants (Figure 2). Since high initial stability was necessary to deliver an immediate lower fixed provisional restoration, Engage™ (OCO Biomedical) dental implants were selected for this case because of their high initial stability for selective loading options.
Using the Mont Blanc® surgical handpiece and Aseptico® implant/oral surgery motor (AEU 7000) at a speed of 1200 rpm with copious amounts of chilled sterile saline, the sites for the implants were initiated with a 1.95 mm pilot drill provided in the 3D Diagnostix Guided Surgical Kit.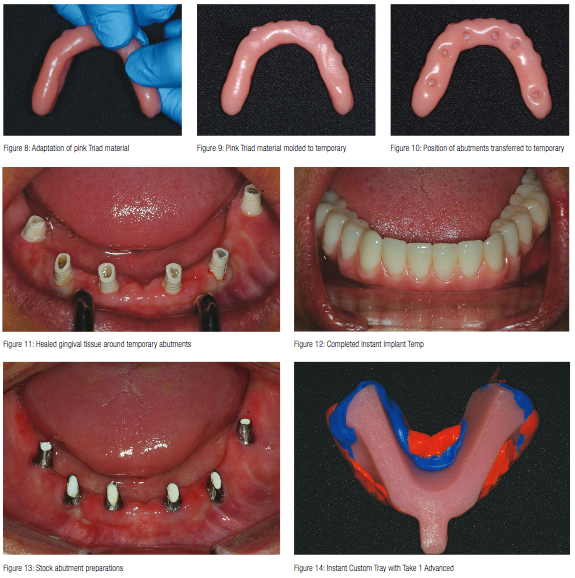
Once the osteotomies were complete, an implant driver was used to place the dental implants (Figure 3) until increased torque was necessary. The ratchet wrench was then connected to the adapter and the implants torqued to final depths reaching a torque level of about 45-50Ncm. Adequate implant fixation was further verified using an Osstell® ISQ implant stability meter (Osstell), which uses resonance frequency analysis as a method of measurement. Several studies have been conducted based on Resonance Frequency Analysis (RFA) measurements and the Implant Stability Quotient (ISQ) scale. They provide valid indications that the acceptable stability range lies above 55-60 ISQ.
Temporary Peek abutments were hand-tightened to the implants (Figure 4) and a postoperative Panorex taken (Figure 5). Once confirmed, a blend of cortical mineralized and demineralized bone grafting material (Maxxeus) was placed in any residual areas of the extractions sites and the tissue sutured. Soon afterward, a carbide bur was used to trim the abutments, so that they would have adequate draw for the fabrication of the provisional restoration.
A medium-size Instant Implant Temp was selected for the lower arch and placed into a water bath of 90-100°C for about 2-3 minutes, making the product moldable. In its thermoplastic state, the temporary was shaped to the appropriate width of the patient’s lower arch (Figure 6). Once set to the desired arch form, the temporary was allowed to cool. Since the internal aspect of the Instant Implant Temp already had adequate clearance in this particular case, no adjustment was necessary to seat the temporary. Instead, pink Triad material was used to fill in the area after application of a bonding agent (Triad) (Figures 7 and 8). The temporary was further molded (Figure 9) and seated on to the abutments. The patient was instructed to bite until the proper vertical dimension was acquired. The temporary was then pulled off making sure not to disrupt the Triad material (Figure 10). Once inspected for accuracy, the Triad material was cured with a hand curing light (Demi Plus, Kerr).
With a lab acrylic bur, the receiving areas were enlarged slightly to allow a more passive fit and spacer for temporary cement. The temporary was then trimmed and polished to create a smooth convex surface for easy cleansability before seating (Figure 11). Esthetics, phonetics, and bite of the provisional were evaluated and documented. The patient was very pleased with the esthetics of this provisional restoration. She was instructed about its care and use in eating, speaking, and biting.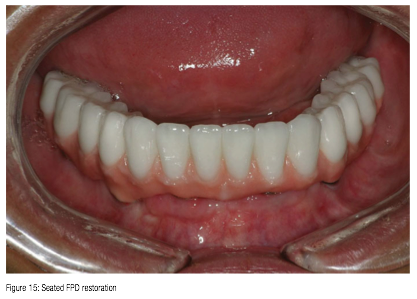
Approximately 16 weeks after implant placement, the patient returned for the final prosthetic phase of her treatment. The gingival tissue around the implants was very healthy (Figure 12), so the temporary abutments were removed and the implants evaluated. Each implant was tested with the Osstell® ISQ implant stability meter (Osstell).
Since all six dental implants were well integrated, stock abutments were placed and tightened to the manufacturers recommended torque level. Using a carbide prosthetic bur in a high-speed handpiece, the stock abutments were prepared using copious amounts of water irrigation to prevent overheating. Once ideal parallelism and distinct margins were achieved (Figure 13), a full arch impression would be taken using the Instant Custom Trays. Adapted and fitted in a matter of minutes, this instant thermoplastic tray was used to take a full arch polyvinylsiloxane impression (Take 1™ Advanced™, Kerr) (Figure 14). Bite relations as well as instructions for size, shape, and color for the full arch porcelain fused to metal restoration were forwarded to the dental laboratory.
Within 3 weeks, the definitive restoration was tried in and radiographs taken to insure complete seating. Once confirmed, the FPD restoration was cemented with Premier® Implant Cement (Premier) and allowed to set (Figure 15). Premier Implant Cement is a non-eugenol resin cement that features a unique, two-stage cure that makes seating the restoration and removing excess cement quick and easy. The rigid final set and low solubility in oral fluids provide an excellent marginal seal and superior retention.
Once seated and cleaned, a Panorex X-ray was taken of the final cement-retained FPD restoration. The patient was very pleased with the result and commented on how much more confident she felt with this new enhanced smile.
Conclusion
Instant Implant Temps can play a valuable role in managing clinical situations to ensure success with the final implant prosthesis. They can be used to evaluate esthetic, phonetic, and occlusal function prior to delivery of the final implant restorations, while preserving or enhancing the condition of the peri-implant and gingival tissues. They provide patients with natural-looking temporaries at any stage of implant treatment and serve as an excellent prototype by which to evaluate shade and contours, leading to greater patient acceptance and a superior definitive restoration.
Stay Relevant With Implant Practice US
Join our email list for CE courses and webinars, articles and mores
