Dr. Jay B. Reznick expands treatment options and optimizes results with methodical treatment planning
The clinical practice of dentistry has changed significantly in the past 10 years due to the advances in digital technology. These changes not only have influenced change in restorative dentistry, but also have changed how things are done in surgical practice. A patient may present with multiple injuries and problems requiring treatment following a traumatic incident. By utilizing digital imaging and CAD/CAM, treatment options can be more easily evaluated to determine the one that will optimize results.

Figure 1: At initial presentation, the patient was found to have palatal displacement of the maxillary central incisors, as well as loss of tooth No. 7
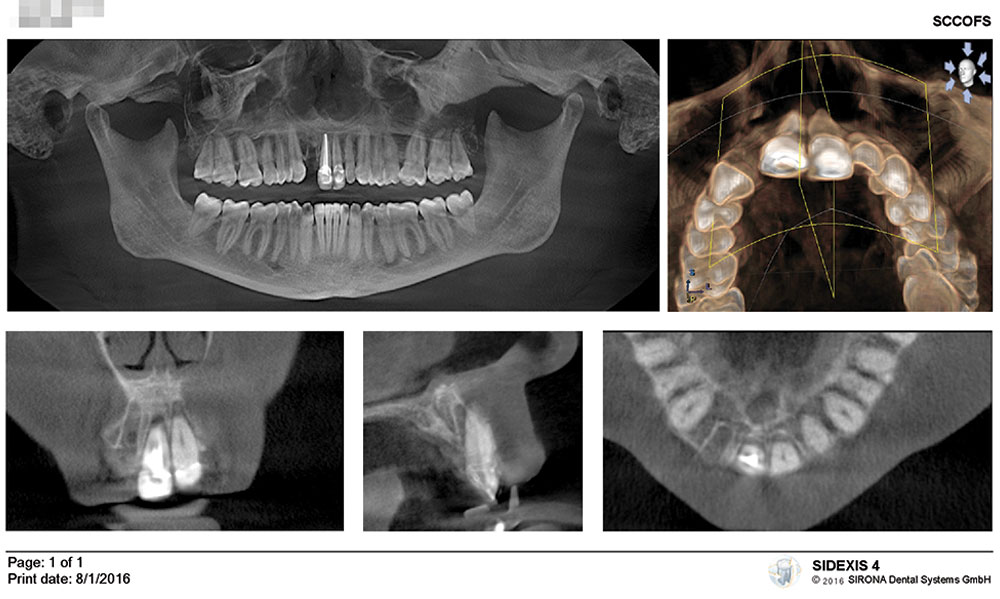
Figure 2: A cone beam CT scan demonstrated avulsion of tooth No. 7 and a dentoalveolar fracture associated with the maxillary central incisors
Case report
An otherwise healthy 40-year-old woman was involved in a rear-end motor vehicle accident on a Sunday afternoon. The air bags did not deploy. She flew forward; and despite wearing a seatbelt and shoulder restraint, her face hit the steering wheel. There was no loss of consciousness. She was seen in the office the following morning for examination. The impact resulted in the avulsion of the maxillary right lateral incisor and palatal displacement of the two maxillary central incisors with fracture of the facial alveolar bone (Figure 1). The two central incisors were mobile and exquisitely tender and were in crossbite. Other than a few bruises and scrapes, her clinical exam was unremarkable. In order to make a clinical decision regarding treatment options, we needed to have accurate information to guide us. Three-dimensional cone beam CT (CBCT) imaging allows us to evaluate the patient’s skeletal and dental anatomy, spatial relationships, and the extent of injury or pathology. Utilizing this technology, it was evident that tooth No. 7 had been completely avulsed, with no residual root fragments remaining. The alveolar bone on the facial aspect of teeth Nos. 7 through 9 had also been fractured by the force of the impact against these teeth (Figure 2). The treatment plan required reduction of the displaced teeth with splinting to allow the dentoalveolar fractures to heal and replacement of the avulsed tooth.
Ideally, we would like to replace the lost lateral incisor as soon after the injury as possible. We know that for maintenance of the alveolar ridge, soft tissue contours, and interdental papillae, there is no better material than a dental implant along with a bone graft placed between the fixture and alveolar bone.1,2 The soft tissue outcome is further improved if a provisional restoration can be placed at the time of fixture placement.2,3 In order to plan for implant placement, there needs to be a blueprint. Following the principles of “prosthetically driven” implant planning, the ideal final prosthesis is designed, and then the implant fixture position is determined. The bony and soft tissue anatomy is assessed, and if there is a need for augmentation or modification, it is determined at the planning stages, rather than at surgery. Ordinarily, when a plan is being developed to replace a missing tooth, the arch form of the adjacent teeth can be used as a reference to design the ideal final prosthesis. In this case, the adjacent central incisors had been traumatically displaced, and if used for determining arch form, the crown of the right maxillary lateral incisor would be incorrectly positioned. In addition, taking standard dental impressions was not practical in this case due to patient discomfort. In order to manage all these challenges, a fully digital workflow is ideal. We began by obtaining an optical impression of the patient’s maxillary dental arch, using a CEREC® Omnicam (Dentsply Sirona). Because the patient was unable to bring her teeth into occlusion, the mandibular arch image and digital bite relationship were not recorded. In the CEREC software, a prosthetic proposal was developed, guided by the ideal position of the final restoration, which will be finalized 4 months after implant placement (Figure 3). Since the maxillary central incisors were in crossbite due to the recent trauma, they were “mentally repositioned” to represent the true dental arch form in order to plan the proposed prosthesis for the missing lateral incisor. The optical impression and digital prosthetic proposal were then exported using an integration file.
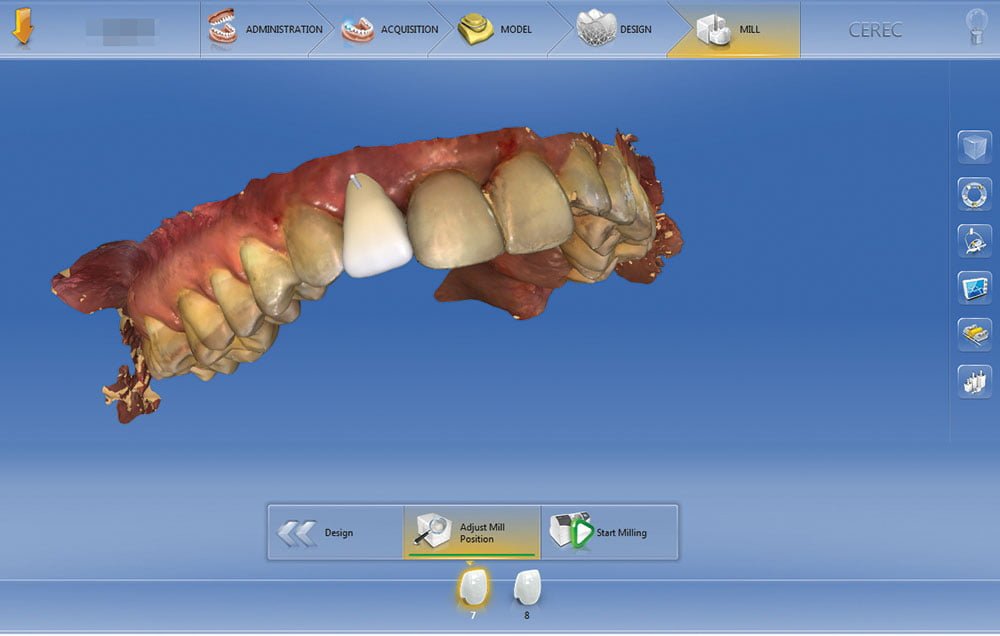
Figure 3: An optical impression was obtained and used to create a digital proposal for the final restoration. This is used to plan the ideal implant placement

Figure 4: The Planning Report shows the planned implant placement based on the prosthetic plan
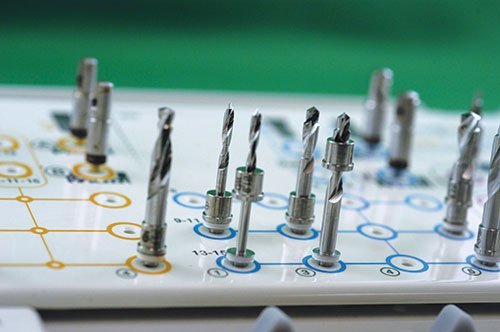
Figure 5: Closeup view of the Astra Tech Implant System EV-guided surgery kit, showing the sleeve-on-drill concept

Figure 6: The stereolithographic (STL) file was as loaded into the 3D printer to fabricate the surgical guide
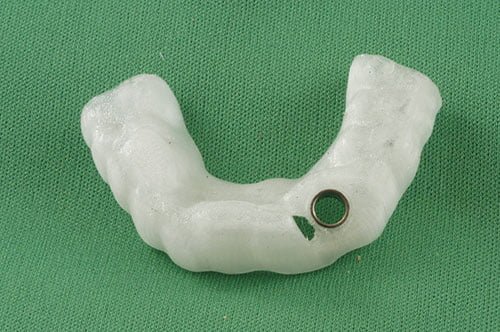
Figure 7: The completed surgical guide that contains the master tube, which is specific for the implant system being used
In GALILEOS® Implant software (Dentsply Sirona), the optical impression and proposal were imported and then superimposed over the cone beam CT image. Using the digitally proposed final restoration as the blueprint for the final prosthetic result, the ideal position, angulation, and depth for the implant fixture were determined (Figure 4). From this image, it could be seen that about half of the apical dimension of the fixture would be located in solid alveolar bone, allowing for good primary mechanical stabilization. However, because of the fracture of the facial alveolar plate, a decision was made to delay placement of a prosthesis until the implant had fully osseointegrated at about 16 weeks after fixture placement. It is essential to use 3D imaging not only for implant planning, but also for placing the implant fixture as precisely and accurately as possible. This is especially true in the anterior esthetic zone. In order to accomplish this objective, the technique of fully guided surgery was utilized. With this workflow, a surgical guide is created from the planning software. Depending on the case, the guide may be milled or 3D-printed. Critical to the success of this guide is a channel into which a metal guide sleeve, or tube, is inserted. The guide tube is specific for the particular implant system being used. For implant systems that are fully guided, a specific drilling system is used. Within that system are drills and drill guides that are designed to fit within the drill tubes in the surgical guide. This sleeve-in-a-sleeve technique allows for precise control of the position, angulation, and depth of each osteotomy and of the implant placed.
In this particular case, an Astra Tech Implant System™ EV 3.6 mm x 15 mm straight-walled fixture was selected in order to maximize primary mechanical stability into the traumatized site. The EV-guided surgery system uses a sleeve, which fits directly on the drill (sleeve-on-drill), thus eliminating the need to use a drill key (aka handle, drill guide, spoon) (Figure 5). Following the consultation appointment, the treatment plan, based on the final prosthetic result, was finalized, and the treatment plan and optical scan were uploaded to SICAT (Dentsply Sirona; Bonn, Germany). Approximately 18 hours later, a printable stereolithographic file for the surgical guide was available (Figure 6). This was remotely sent to a 3D printer (CEL-Robox), and printing of the surgical guide was begun. Once the surgical guide printing had been completed, the build platform was removed, the surface smoothed and polished, and the guide tube was inserted, making the guide ready to use (Figure 7).

Figure 8: The position of the master tube in the surgical guide controls the position, angulation, and depth of each osteotomy and fixture placement

Figure 9: An Erich arch bar with circumdental 26 gauge stainless steel ligatures was used to stabilize the displaced dentoalveolar segment
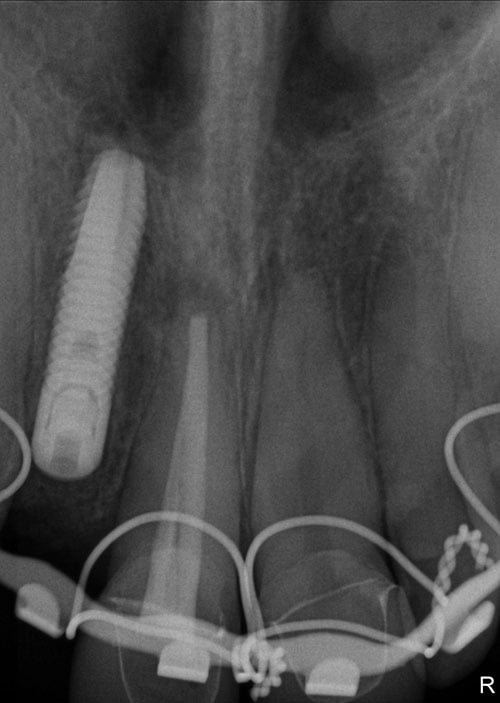

Figures 10 and 11: 10. At the 6-week follow-up visit, the displaced teeth showed no significant periapical changes and remained asymptomatic. 11. At 14 weeks, the implant was osseointegrated, and the displaced teeth were stable and asymptomatic
The patient presented for surgery on Tuesday morning, less than 24 hours after initial consultation, examination, and treatment planning. The site of the avulsed tooth was debrided and irrigated, and then the implant surgical guide, which had been produced from all digital data at the time of initial examination, was used to prepare the osteotomy and to place the implant fixture into the planned site at the proper angle and depth for ideal restoration (Figure 8). Once the implant had been delivered, a cover screw was placed, and allogeneic freeze-dried calcified cancellous bone powder (Symbios®, Dentsply Sirona) was placed between the fixture and socket walls, and into the facial bony defect. A collagen barrier was sutured over the implant and graft, and then stabilized with sterile cyanoacrylate tissue glue (PeriAcryl®, Glustitch). The displaced maxillary central incisors were then reduced into their correct anatomical position, which was verified by bringing the patient’s teeth into full occlusion. The teeth and surrounding fractured alveolar bone were stabilized using an Erich arch bar, which went from the maxillary right first premolar to the left canine, using 26 gauge stainless steel wire (Figure 9). Finally, maxillary and mandibular polyvinyl siloxane (PVS) impressions were taken of both arches to allow the lab to fabricate a removable prosthesis for the missing lateral incisor. This was able to be quickly fabricated, so that the patient was able to leave the office with the provisional appliance in place. A postoperative panoramic radiograph was taken in addition to periapical images of the central incisors (Figure 10). The implant placement was as planned, and the incisors were well situated in their sockets.
The patient was seen for periodic follow-up, and at 6 weeks, the arch bar was removed. The surgical sites healed well, and the central incisors remained asymptomatic. Radiographically, there was no change in this region (Figure 11). At approximately 16 weeks after surgery, second-stage surgery was performed to remove the implant cover screw and to place a transgingival healing abutment. A papilla-preserving crestal incision was made at the lateral incisor site (Figure 12). The central incisors continued to remain stable and symptomatic. Once the incision had healed, the patient was then referred to her general dentist for prosthetic restoration of the implant (Figure 13).

Figure 12: The implant was exposed at 16 weeks using a papilla-sparing crestal incision, and the flap was repositioned against the healing abutment
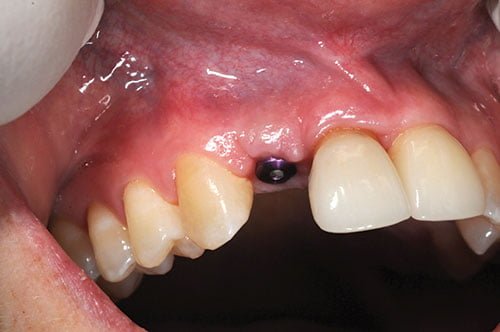
Figure 13: Two weeks after exposure, the patient was referred to her general dentist for prosthetic restoration of the implant
Discussion
In this case, we were able to, by utilizing a fully digital workflow, replace a traumatically avulsed maxillary lateral incisor tooth with a dental implant less than 48 hours after injury. The final prosthetic plan was developed, and this digital blueprint was used to determine the ideal implant position. Using a custom surgical guide and fully guided technique, the implant fixture was placed exactly as planned in order facilitate ideal prosthetic restoration.
Prior to this technology being available, dental implant placement would have been performed using a freehand technique, with the final result being dependent on the experience and skill of the surgeon. Studies have shown that the occlusal implant position can be off as much as 3.0 mm laterally and 9.9º in angulation from the planned position.4 This can lead to aberrant fixture placement, which could lead to the implant being placed too far facially or at an angle that complicates restoration. Even very experienced surgeons placing implants freehand cannot compare with the accuracy of guided surgery.5
One of the major impediments to the widespread acceptance of guided surgery for immediate implant placement has been the turnaround time between treatment planning and surgical guide availability, which has typically been anywhere from 1 to 3 weeks, depending on the software and laboratory being used. This is usually not acceptable when a patient presents with an acute problem, such as a fractured maxillary incisor, which requires removal and replacement. Therefore, most surgeons still prefer freehand implant placement in this situation, rather than delay treatment. Utilizing digital technology, we were able to treat this patient very predictably and successfully in a time-sensitive manner. Because the variables of ridge volume and anatomy were known prior to surgery, the treatment plan did not need to be modified during the procedure, and the implant was placed in the ideal location for restoration. Through methodical treatment planning, using all the data available, we were able to sequence the implant placement, reduce the fracture with stabilization, and fabricate a provisional prosthesis while making efficient use of our surgical time and providing optimal patient care.
 Jay B. Reznick, DMD, MD, was one of the first North American adopters of fully guided, prosthetically based implant surgery and was the first specialist in the United States to integrate CBCT and CAD/CAM in his practice. He has taught dentists about basic and advanced implant dentistry, surgery, and 3D digital technology for the last 2 decades. Dr. Reznick has published extensively in the dental and medical literature, and founded the educational website OnlineOralSurgery.com. He lectures frequently at dental meetings and educational conferences, as well as teaches live training courses to dentists from all over the world.
Dr. Reznick is a Diplomate of the American Board of Oral and Maxillofacial Surgery. He received his undergraduate Biology degree from CAL-Berkeley, Dental degree from Tufts University, and his MD degree from the University of Southern California. He did his internship in General Surgery at Huntington Memorial Hospital in Pasadena and trained in Oral and Maxillofacial Surgery at LA County + USC Medical Center.
Dr. Reznick is also a consultant to a number of manufacturers and suppliers of dental and surgical instruments and equipment, and is on the editorial advisory boards of a number of dental journals. He is the Director of the Southern California Center for Oral and Facial Surgery in Tarzana, California.
Disclosure: Dr. Reznick is a consultant and key opinion leader for Dentsply Sirona.
- Tarnow DP, Chu SJ, Salama MA, et al. Flapless postextraction socket implant placement in the esthetic zone: part 1. The effect of bone grafting and/or provisional restoration on facial-palatal ridge dimension — a retrospective cohort study. Int J Peridontics Restorative Dent. 2014;34(3):323-331.
- Cooper LF, Reside GJ, Raes F, et al. Immediate provisionalization of dental implants placed in healed alveolar ridges and extraction sockets: a 5-year prospective evaluation. Int J Oral Maxillofac Implants. 2014;29(3):709-717.
- Chu SJ, Salama MA, Garber DA, et al. Flapless postextraction socket implant placement, part 2: The effects of bone grafting and provisional restoration on the peri-implant soft tissue height and thickness — a retrospective study. Int J Peridontics Restorative Dent. 2016;35(6):803-809.
- Vercruyssen M, Cox C, Coucke W, Naert I, Jacobs R, Quirynen M. A randomized clinical trial comparing guided implant surgery (bone- or mucosa-supported) with mental navigation or the use of a pilot-drill template. J Clin Periodontol. 2014;(7):717-723.
- Vermeulen J.. The accuracy of implant placement by experienced surgeons: guided vs freehand approach in a simulated plastic model. Int J Oral Maxillofac Implants. 2017; 32(3):617–624.
Stay Relevant With Implant Practice US
Join our email list for CE courses and webinars, articles and mores

